A few weeks ago, we have released G-Stomper Producer 1.0, a brand new music production app for Android. G-Stomper Producer is based on the well known audio engine of G-Stomper Studio, but is more focused on production, and therefore works different in many aspects. This article gives you a short roundup about its key features and the differences to G-Stomper Studio.
What is G-Stomper Producer?
G-Stomper Producer is a fast and flexible Music Sequencer and Digital Audio Workstation, designed for use in live performance as well as for production. It comes with a powerful Drum Sampler, a polyphonic and multi-timbral Virtual Analog Performance Synthesizer (VA-Beast), Sounds, Effects, Sequencers, Pads and Keyboards, a graphical Multi-Track Song Arranger, and many other creative features that help you to create your own music.
Jam live, improvise and let the music happen spontaneously, play patterns of different lengths/quantizations, simultaneously and in any combination, without having to stop the sequencer at any time, and finally write your creation down as a Song.
G-Stomper Producer is the answer to zillions of feature requests over the last 6 years that have been technically impossible to be integrated in G-Stomper Studio.
G-Stomper Producer comes 1) with a new, intuitive navigation concept, 2) with independent timing and measurements per track, and 3) with a brand new multi-track song arranger.
Here are the core differences between G-Stomper Studio (GSS) and G-Stomper Producer (GSP):
G-Stomper Studio
- 1 Sequencer that can play one Pattern (and timing) at a time
- A pattern contains up to 36 tracks, which are all bound to it and to the surrounding sequencer (that’s the old hardware groovebox way).
- With this setup, it’s technically impossible to arrange a song track by track.
G-Stomper Producer
- 1 Global Sequencer
- Up to 39 Track Sequencers (each with its own patterns and timing)
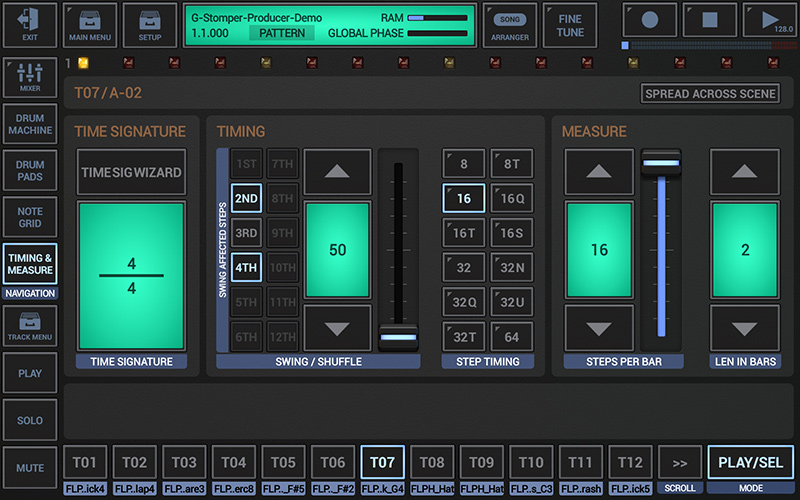
- So you can mix for example a kick drum at 4/4 with a triplet high hat at 5/8, each with totally independent timing (including swing).
- The tempo/bpm of the particular track sequencers is always synced with the global sequencer, but the step timing, swing, and pattern measurement can be different per track.
- As everything is split into tracks on sequencer base, you’ll be able to arrange your songs track by track.
For direct feature comparison, please check out our Product Comparison Chart.
Scenes
Scenes in GSP are used as a quick access of multiple track patterns at once.
In theory, you can see a GSP Scene as something similar to a GSS Pattern, just with totally loosely coupled and independent tracks.
Toolbars
Other than in the G-Stomper Studio, the toolbar on top is fixed, it won’t change when the main content changes. This means you’ll always have direct access to the main menu, the setup menu, the project display, and other common functions. In addition to the toolbar on top, you have a sidebar at the left side.
Long pressable buttons
As known from G-Stomper Studio, long pressable buttons have a little triangle mark in the upper left corner. So if you see such buttons, just try to long press them.
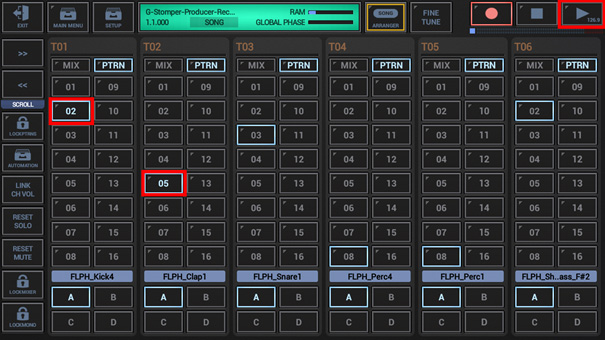
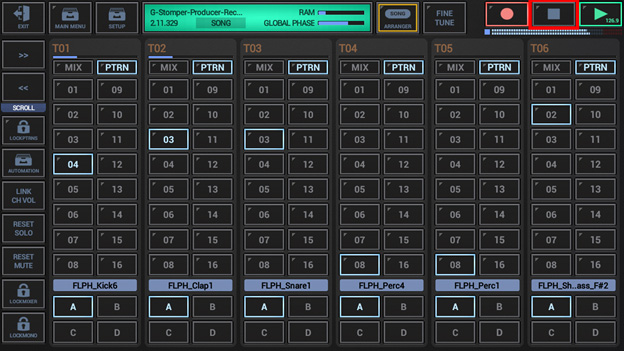
Main Mixer
When you start the app, you’ll always be dropped at the Main Mixer.
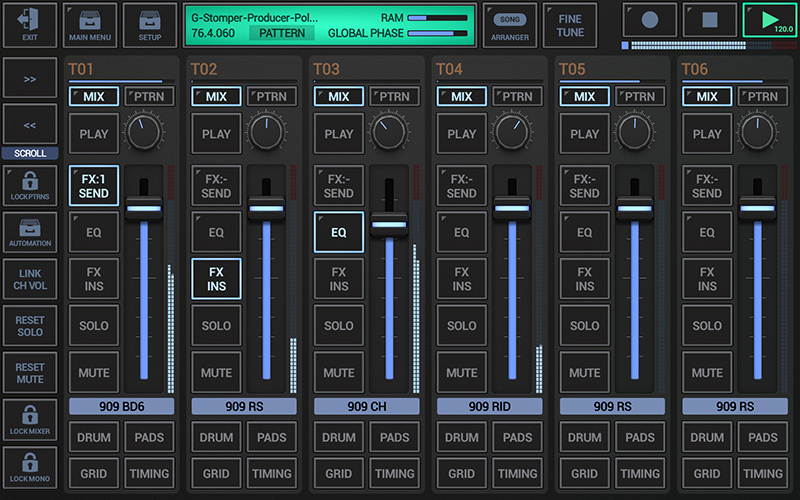
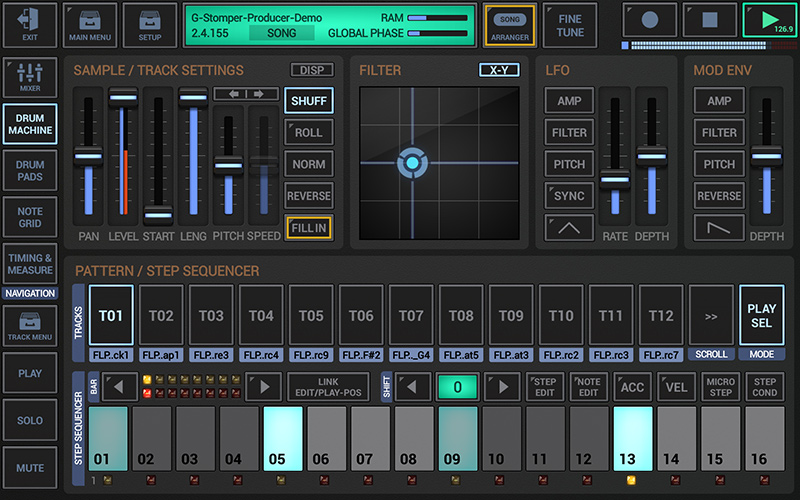
The mixer is the place where you (beside all around mixing, fx, master, etc.) have access to all per Track Pattern Sets and the surrounding Scenes. Other than in G-Stomper Studio, where you have one single set of patterns, G-Stomper Producer provides a set of 64 Patterns per Track. In other words, you are able to create all poly-rhythms you ever dreamed of, as G-Stomper Producer allows an individual timing per track (pattern measurement, step timing, swing, quantization). To dive into the detail modules of a particular track, press one of the 4 buttons at the bottom of the mixer channel.
Detail Pages
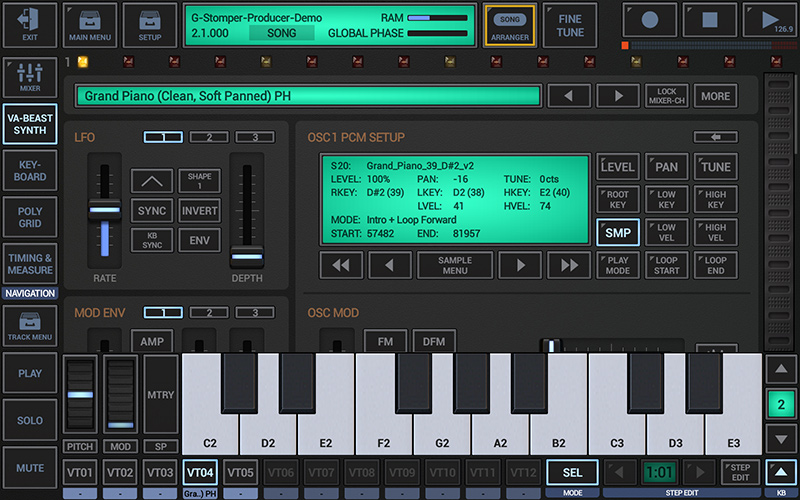
Each track provides a set of detail pages such as the Drum Machine, Note Grid, Timing & Measure, or the VA-Beast Synthesizer.
While in the detail modules, you’ll get a dedicated sidebar (left side by default) to switch between the different detail pages, and to access the track menu (if any), Solo, Mute, etc.
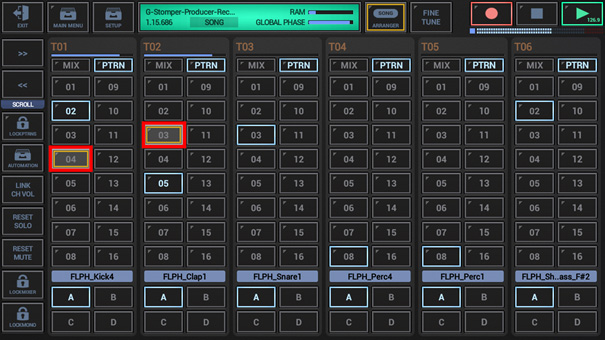
Live Track Pattern Arranger
On top of each mixer channel (incl. Temp Track, FX Track, and Master Track) you can toggle the channel/track between mix and pattern.
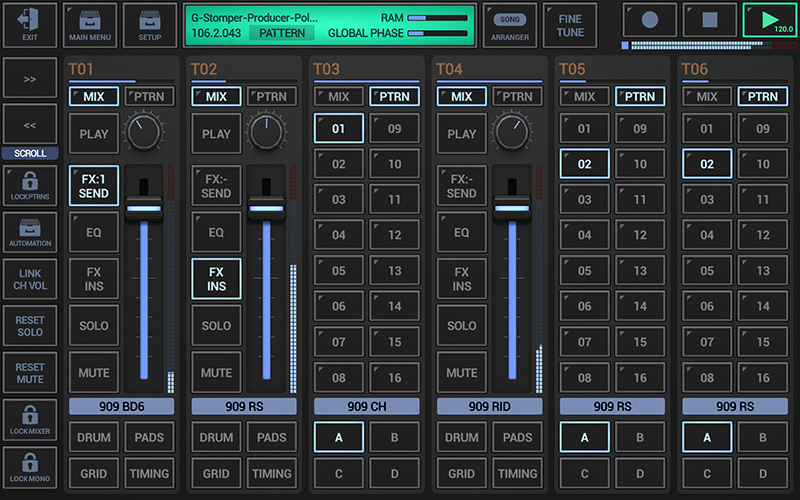
Short press PTRN to switch to the Live Track Pattern Arranger of a particular track, long press PTRN to switch all tracks to the Live Pattern Arranger. Short or long press MIX to get back to the mix channel view.
Note: To select another pattern while in a detail view (like the main drum machine for example) without having to navigate back to the mixer, long press the Mixer button in the Detail Sidebar (this will open the Quick Pattern Selector).
Live Scene Arranger
The Live Scene arranger is located on the last page of the mixer. You can scroll through the pages in use of the >> and << buttons in the sidebar.
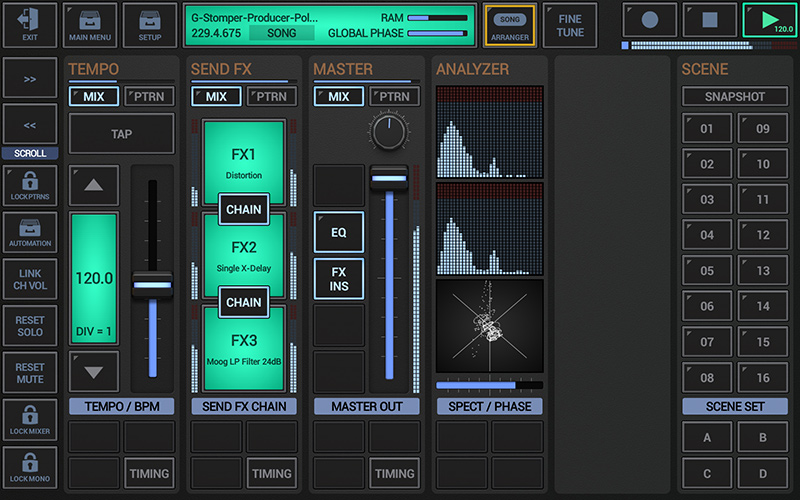
A Scene is a reference to a collection of “Track Patterns”, all of the same pattern slot. If you press A-02 in the scene arranger, then on all tracks, A-02 will be selected. When you come from G-Stomper Studio, then a G-Stomper Producer Scene is the closest thing to a known G-Stomper Studio Pattern. Scenes are part of the surrounding project, but can also be saved and loaded separately if required. For example, you can also import a single G-Stomper Studio/Rhythm/VA-Beast Pattern as a Scene.
Note: To select another Scene while in a detail view (like the main drum machine for example) without having to navigate back to the mixer, long press the Main Menu button in the Toolbar on top (this will open the Quick Scene Selector).
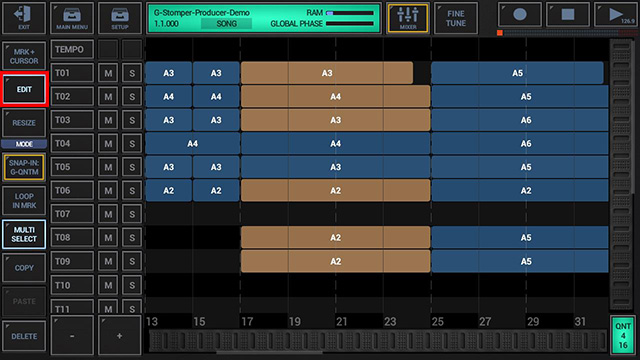
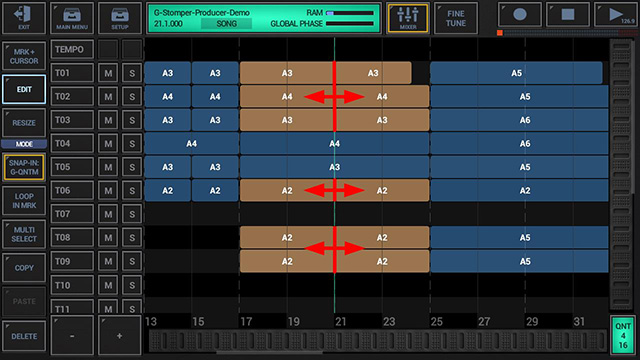
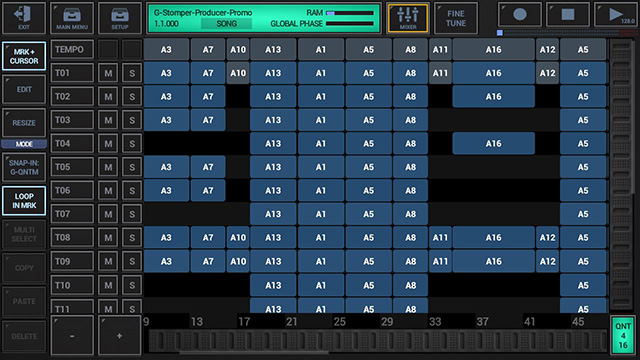
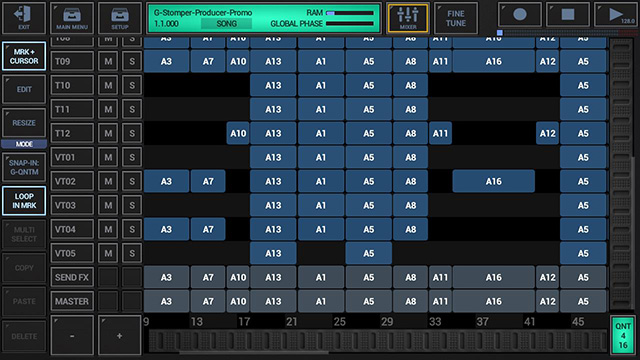
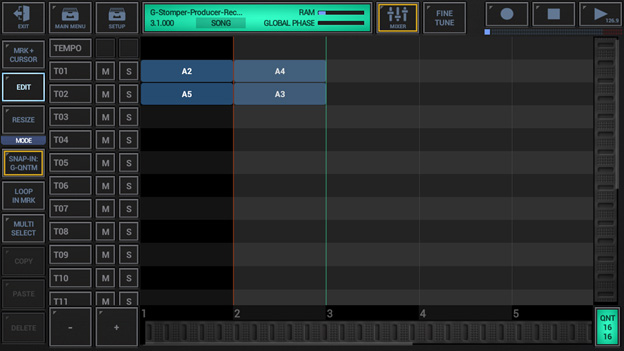
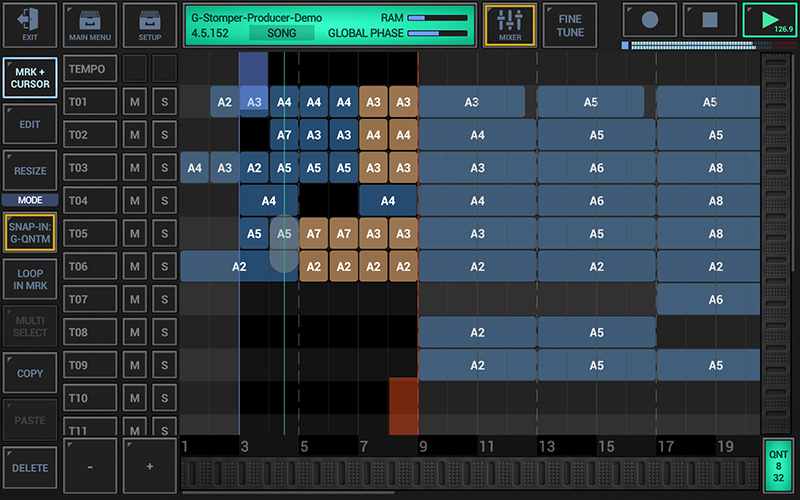
Multi-Track Song Arranger
The new Multi-Track Song Arranger is one of the core elements in G-Stomper Producer. It was the most requested feature over the last few years and one of the reasons why we have created this new app.
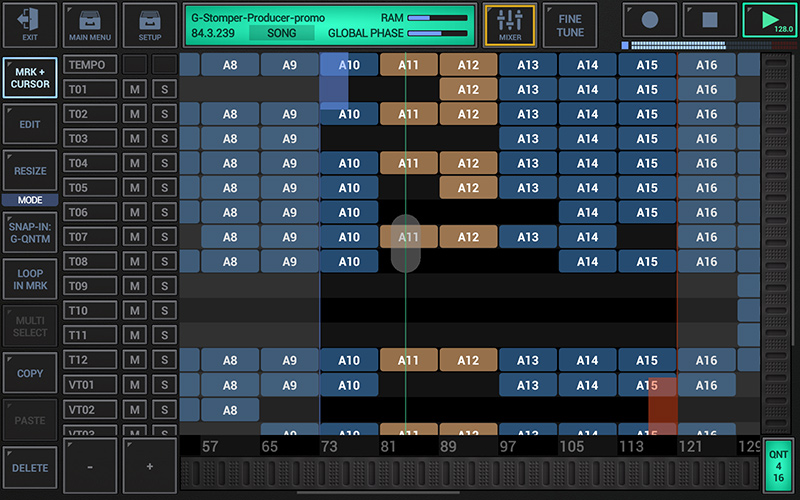
With the “Song Arranger/Mixer” button at right side of the Project Display (in the toolbar on top), you can toggle between the Mixer and Song Arranger view. Please take note that switching to the Song Arranger view does not automatically switch to Song operation as well. To toggle between Pattern and Song operation, either long press the “Song Arranger/Mixer” button or simply short press the “Pattern/Song” area on the Project Display.
In the Song Arranger view, use the “+” and “-” buttons to zoom the grid in or out (short press for horizontal zoom, long press for vertical zoom). Use the scrollbars at the bottom and right side as well as the track list at the left side to scroll freely in the Song Arrangement. By default, the markers snap in to every “global quantum” when you move them. You can toggle the snap in between beat, global quantum, and virtual quantum. The global quantum as well as the virtual quantum can be changed by clicking the quantum display in the lower right corner of the Song Arranger.
The Scale at the bottom of the Song Arranger grid shows the number of global quantum cycles at the particular positions, which matches with the first number of the timing information in the info display on top. You can optionally activate vertical grid lines in the Song Arranger grid. Just click the quantum display in the lower right corner to show up the quantum settings, and then activate the “Activate Quantum Grid Lines” checkbox.
The editor should be pretty much self-explaining.
Touch handling in Edit/Resize mode:
- Short Click event: Select/Deselect event
- Short Click empty space: Add Event (default size = global quantum, can be changed by clicking the project display on top)
- Long Click event: Change selected event(s) pattern
- Long Click empty space: Add Events for the complete Scene (default size = global quantum, can be changed by clicking the project display on top)
- Tap and drag Event: Move/Resize (depending on the selected mode)
Multi Select modes (sidebar):
- OFF: Select one single Event
- ON: Select multiple Events by clicking them one by one
- ON-Quick-Select (yellow border): Select multiple Events by swiping over them.
Long press the Multi Select button to show up an extended menu where you can select all events at once for example.
Note: The ON-Quick-Select mode deactivates itself as soon as you release your finger from the screen. So in other words, you turn this special selection mode on, then you swipe over the events you want to select, then release your finger and the Multi Select mode gets automatically changed to ON. Then you can just move or resize the selected events without any further clicks in between.
Copy, Paste, Delete (sidebar)
These buttons do exactly what they say, copy, paste and delete Song events. Copy and delete operations are always directly related to a selection of Song Events, while paste operations are related to previously copied Song Events.
Long press the Copy, Paste, and Delete buttons to show up their extended menu with more specific operations.
Event overlapping error detection:
The Song Arranger can visually and technically overlap Song Events in the same Track. This is required to be able to place Song Events intuitively, move them around, resize them, and so on. It’s important to know, that you can overlap Song Events of the same Track in the UI, and you can even properly save Projects that contain Song Event overlaps. But the Sequencer cannot handle overlaps. In other words, the Sequencer of a particular Track can always play only one of its Patterns at a time. Therefore such overlaps are highlighted in red color, so that you can find them easily and fix them.
Project Display
The Project Display in the toolbar on top provides (beside to the project name and the RAM usage) a numeric and graphical interpretation of the global phase. The global phase shows the global timing, which surrounds all track sequencers. The global timing is required (as G-Stomper Producer offers an individual timing per track) to keep all track sequencers in sync and to organize the song structure. Each track sequencer gets automatically synchronized with the global timing. To change the global quantum (the number of beats per global loop cycle), short press the project display (or likewise long press the play button).
Hidden Features
- Short press the project display in the toolbar on top to show up the quick sequencer setup, where you can change the tempo, set the global Quantum, and setup Ableton Link.
- Long press the project display in the toolbar on top to force a re-sync of the phase between the different tracks/sequencers (this might occur in some situations, but ONLY if NOT synchronized with Ableton Link; Ableton Link forces the phase automatically).
- Short press the Song/Pattern operation button inside the project display to toggle between Pattern and Song operation (same can be done by long pressing the song arranger button right beside the display).
G-Stomper Studio, Rhythm and VA-Beast Files
As a matter of course, G-Stomper Producer imports all kind of files from other G-Stomper apps, such as G-Stomper Studio Pattern Sets, Sound Sets, Patterns, VA-Beast Presets, and more.
G-Stomper Producer – Quick Start Guide
If you don’t have the time to watch the Video Tutorial, you can also check out the Quick Start Guide chapter in the User Manual.