< Previous | Contents | Next >
Bouncing is supported by G-Stomper Studio and G-Stomper Producer. Both can bounce single Samples, complete Tracks, and multiple Tracks.
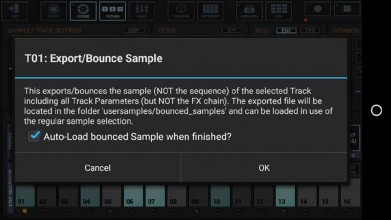
Bouncing a Sample means to create a new Sample from a Track Sound with all Track related audio processing (Sample/Track Settings, Filter, Mod Env and Mixer Channel settings including Channel Insert Effects and Channel EQ) rendered into, and to load the bounced sample to the original Track afterwards.
Please note that bouncing a Sample does not include the Sequence. Also note that the main Effect chain is not included when bouncing single Samples. To include the Sequence and the Effect chain to the bounced result, bounce the complete Track instead (see Chapter(s): Bounce complete Sampler/VA- Beast Track).
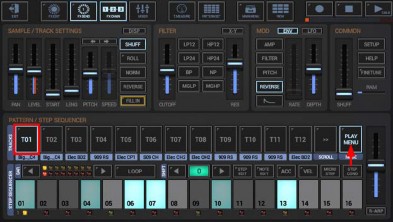
Show up the Track Menu of the Track you want to bounce.
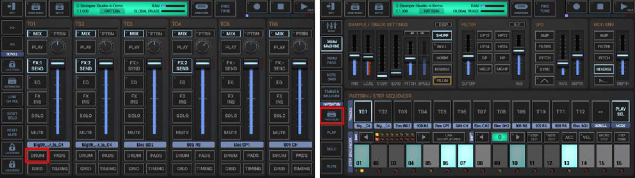
Depending on the used App, the Track Menu location and its content might be different.
Long press a T[..] pad to show up the Track menu (Track Pad Mode must be Play/Menu).
Press the “Drum” button in one of the Mixer Channels to show up the Drum Machine, and then open the Track Menu in the sidebar.
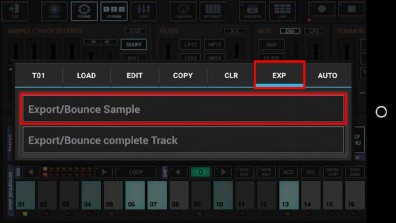
To bounce the Track Sample, select the EXP tab, and then choose “Export/Bounce Sample”.
By default, the bounced Sample gets automatically loaded to the Track, once the bouncing process is done.
If you don’t want to auto-load the bounced Sample, disable this checkbox.
Select the Export Format.
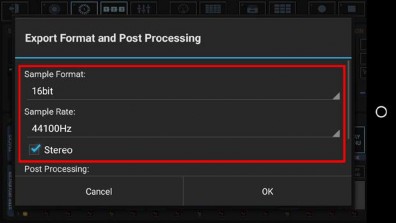
Bit Rates: 8bit, 16bit, 24bit, 32bit(float)
Sample Rates: 22050Hz, 32000Hz, 44100Hz, 48000Hz, 64000Hz, 88200Hz, 96000Hz
What sample format you choose strongly depends on your personal needs. In most cases, the best choice for bounced Samples is to keep the defaults.
Select a Post Processing method.
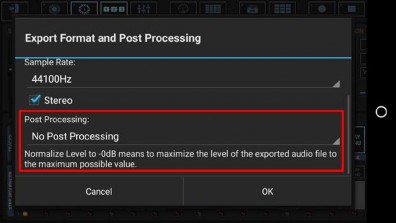
For bouncing, in most cases „No Post Processing” is the best choice (which is the default for all bouncing operations).
Further Post Processing options:
- Normalize Level to -0dB (channels linked)
- Normalize Level to -0dB (each channel independently)
- No Post Processing (leave the mix as is)
Choose a name for the bounced sample.
(By default, the bounced file is named as the original Sample)

Finally, confirm with OK to start the bounce process.
Be aware of overwriting already bounced Samples. Overwriting a bounced sample will replace the Sample on all Patterns/Tracks where it was used already. If you’re not sure about that, choose a new (non-existing) file name instead.

 Get this Doc as PDF